Wednesday, March 30, 2011

Yarn Along #3

What with one thing or another (illness, busyness) I didn't have a chance to post my "Yarn Along" the last two weeks.  However, that doesn't mean I wasn't knitting! 

Currently In Progress:


I stole an idea from Josee at Through the Thorns to the Stars and started an Easter dress for my daughter.  I'm using the "Bloom" pattern on Ravelry, by Georgie Hallam.  I love her patterns - they are so clearly and cleverly written, and so girly and pretty!  The yarn is Knit Picks Swish DK in Sugarplum.  I started this about a week ago, and it is knitting up quite quickly.

Other Projects I've Completed Recently:


Remember the fingerless gloves to match my hat?  All done, and I'm getting great use out of them as spring lingers late in the northeast (in fact, it's rumored we're going to get hit with another snowstorm on Friday).  I'm sick of the cold, but at least my hands will be warm!  It's amazing how comfy fingerless gloves are; I find that I want to leave them all the time, and I can, because my fingers are still free.

Also, in the interim, I made a toddler-sized Shalom Cardigan.  Sizing was a stab in the dark, because I couldn't/didn't want to figure out the math for what gauge I should be shooting for, and really didn't want to adjust the number of stitches.  The adult-size pattern called for US 10.75 (7 mm) needles and bulky weight yarn; I subbed DK weight yarn (Knit Picks Swish DK in the discontinued color Periwinkle) and used US size 6 (4.25 mm).  I didn't adjust the stitch count at all, although I did add two extra button holes and slightly reduce the number of stitches cast off into the sleeves, thus increasing the bodice size slightly so that the cardigan could close for those two extra buttons.  It turned out so perfect!  My next project, after I finish LW's dress, will be to make one of these for myself.


Here's LW modeling it (actually, I distracted her with bubbles so that she'd hold still for pictures)


"Bubbles!"

"Done with the bubbles.  Take this sweater off NOW"
and what it looks like from behind (pardon the dark shot)


What I'm Reading:

A couple of random books arrived in the mail earlier this week.  They were addressed to me, but I hadn't ordered them, and was baffled as to where they had come from.  Turns out my cousin was sending me birthday gifts from afar.  One of those books was a volume of poetry: Red Bird, by Mary Oliver.  I'm very much enjoying it (as I could have guessed I would - my cousin has excellent taste in books).  I'm also finding myself reaching for Perelandra lately, to re-read it for about the hundredth time.  It's a great book for Lent, because it explores the nature of sin, grace, paradise lost and paradise retained; it's also a great book for any time when the future is a little bit unclear.  I'll leave you with my very favorite quote:
"He gave me no assurance.  No fixed land.  Always one must throw oneself into the wave." - C.S. Lewis, Perelandra
Happy knitting, everyone!  As always, be sure to head over to Small Things for the Yarn Along roundup.

Monday, March 28, 2011

Guest Post at CMO Today!

My grandiose plans to blog more this month were pretty completely derailed by coming down with something akin to the flu nearly two weeks ago (actually, LW came down with it first, then me, then my husband).  I'm still recuperating, and since I don't get vacation days from work, being part-time, it's going to be a little while before I dig myself out of the pile of "mandatory" things that need to be done.  In the meantime, though, please check out my guest post over at Catholic Mothers Online today: Tips for Avoiding Mommy Meltdowns.

And, lest I unintentionally come across as some sort of transcendentally calm guru-mama - believe me when I say that I've sorely needed to take my own advice the last few weeks!

I'll (hopefully) be back soon with more thoughts, if I can just stop coughing long enough to type.

Wednesday, March 9, 2011

Yarn Along # 2

Time for another Yarn Along!  Find a ton more Yarn Along posts over at Small Things.

Wow, the week flew by.  But I was right, thinking about Yarn Alongs did prompt me to start another project right away.  It also started me searching through the endless archives at Ravelry, and making many plans for projects to come.

Currently on my needles:


One finished fingerless glove, and a mate for it just started.  I made these using the Vancouver Fog pattern on Ravelry, in the same yarn to match my hat from last week.  I did tweak the pattern slightly - first, using smaller needles, because I knew I'd need to in order to get gauge, and second, to add "fingerless fingers."  I prefer that to having just the "sleeve" around my hand, because I think the short little finger tubes keep the whole thing in place better.  Anyway, I'm pleased with how the first turned out, and being a quick knit, should have the second one done in time to use them a bit before spring arrives.  Given Monday's snowstorm, I guess it may be awhile anyway.

Currently in my head:

Kitten's First Full Moon.  My daughter LOVES cats.  She really, really adores them.  We can't wait to be able to get her one of her own, but in the meantime, we keep a steady stream of cat-themed books coming into the house.  This is her latest favorite.  The illustrations are lovely (black and white), although I am personally more partial to the sing-song rhythms of her last favorite, So Many Cats ("we had a cat, an only cat, it was a sad and lonely cat...")

Take Three Tenses.  I've been on a Rumer Godden kick for awhile now, and am enjoying this novel that I hadn't previously read before.  Not quite as much as I enjoyed China Court and In This House of Brede and Five for Sorrow, Ten for Joy, but still thoroughly enjoying.  She wrote such lovely novels, and as a literary geek and T.S. Eliot fan, this one has extra appeal, because she weaves portions of Eliot's poem East Coker throughout.

Currently on my heart:

Lent starts today.  Actually, I'm writing this Tuesday, which when I post it will be yesterday ("time present and time past"!), so that I can just log in, post my draft, and go back to observing a quiet day.  I don't have grand plans for this Lent, just little ones, but I'm hoping that through little things God's grace might make big changes in me.  As such, I'm turning my heart thoughts towards the transforming power of His spirit, and delving into a book that my mom bought me awhile back, which I hadn't really worked my way through yet: Choosing Beauty.  I'll let you know how I like it, after I've read a bit more.

That's it for today!  Stay tuned for upcoming thoughts on 1) thinking about starting a Mom's group, and 2) learning to trust God's plan in whatever circumstances your life is currently offering.

May you have a blessed Ash Wednesday, and a holy journey this Lent, finding Christ through His Cross, so as to merit the glory of His Resurrection!

Monday, March 7, 2011

Snowed In!

Yesterday, our driveway was clear, our vehicles dry, and patches of bare ground had appeared.

Today:


I'd like to point out that yes, that snowdrift IS completely covering the front of our second car, and yes, the pathway to our car (note, as I said, yesterday you could see bare ground) is completely gone, buried between at least three feet of snow.

But I'm not complaining, because 1) my husband got the day off from work, and 2) it's pretty lovely to curl up with hot soup, hot cocoa, my warm toddler, and watch the snow from a warm house.  A perfect day to read and knit and help LW "cook" things on her new stove.

What about you?  What's the weather like in your part of the world?

Thursday, March 3, 2011

A Toddler Kitchen from (Mostly) Repurposed Items

Finally!  It's done.  Or at least, done enough to blog about.  There's one final detail that can't be done for a couple of weeks, but I've basically finished LW's stove!

I got the idea for this back around Christmas.  LW was just starting to get the idea of "cooking," and it seemed like something she'd really enjoy.  Our Christmas visit to my mother-in-law's house confirmed it: she'd found a toddler kitchen somewhere, and my daughter really went crazy playing with it for the two days we were there.  One of my mom and dad's presents to her was some toddler cookware, so when we got home, I started looking around for something that could function as a stove.

Now, truth be told, I really have my heart set on either buying or building something like this one by Camden Rose.  But we didn't, don't, and won't have that kind of cash kicking around anytime soon, and until my father gets his real woodshop up and running (he has the tools, but needs to build the shop to house them and move it all out of their basement), building won't be happening, so I needed a good interim solution.

While looking around our own basement for inspiration, I uncovered and remembered this:

(I know the picture is dark.  I took this photo right before we started working on it, we were at my parents' and I didn't have my good camera, so had to settle for my husband's phone)

This ugly, beat-up TV stand has been in my family for nearly my whole life.  My grandmother picked it up at a yard sale when I was maybe 7 or 8, I think she used it briefly (or maybe not?), and then it was my parents' TV stand for years.  Around the time I was 18, my brother and I got them an entertainment center as an anniversary gift, and the TV stand was retired, only to then go off to college with me.  It followed me to my first apartment, back home again, then to our apartment when we got married.  Shortly after LW was born, our landlords gave us their old stand, which was much nicer, so this one again was retired.  Really, I was planning on junking it, but fortunately hadn't gotten around to it yet.


Pictures don't really do adequate justice to how junky this thing was.  Made of that wood veneer particle board, which had gotten water damaged and was all bubbly across the top, it probably wasn't worth much when brand new, and I think my grandmother got it for for around $5, over twenty years ago; suffice it to say, it had seen better days.  This picture was actually taken after the first modification: whoever put it together in the beginning, put the bottom shelf at a weird sloping angle (perhaps it was supposed to be that way, to hold VHS tapes?), so I removed two of the screws and put it back on flat.

We (my journeyman carpenter earlier in life, father and I) removed the top piece, and I sanded it down.  Then we cut a circular hole on the right hand side, cut a new backpiece as the existing one was broken, and put everything back together.  I painted, painted, and painted some more - four coats in all - and here it is.  As my husband said, "Wow, who knew it could look that good.  We should have painted it a long time ago!"


Despite sanding it flat, the bubbles reappeared once I put the paint on - probably because those areas swelled more with the moisture.  But after the fourth coat of paint, they weren't really that noticeable.

Also providentially (for me, anyway), my aunt's faucet had broken recently, and my dad went over to fix it while I was visiting.  I quickly pleaded with him to save the faucet for this project.  This was fortunate, as these faucets are quite pricey new, and I hadn't been able to find a used one.  This also added to the multi-generational and sentimental value of the piece, because my aunt lives in what was once my grandparents' house.  They both passed away years ago, but this is the faucet that they used for years and years, and which I remember using at their house whenever I visited while growing up.

Of course, it was pretty obvious that it'd been in use for years when I first got my hands on it:


That's about 30+ years of mineral accumulation.  It polished up nicely, though, as you can see in the next photo, where I've polished just one side for comparison:


My dad used a hacksaw to cut the copper wires off from the bottom; here it is all polished and ready to go.


We drilled two holes in the top of "stove" to screw it down, and after the paint finally dried, I attached it.  We also purchased a stainless steel bowl for the "sink", which I left unattached so that LW can take it in and out (I think this is her favorite part), and also so that I could fill it with water or bubbles and be able to dump it easily.  Here it is, attached:


For the "burners," I found these wide, grooved coasters on Amazon.  They are just the right width for her pots, and the grooves made them the closest thing to real that I could find. 


I spray-painted them with a glossy, "metallic black" spraypaint; it has little gold flecks in it that worked perfectly to make the finished product look real.  The bonus was that I "thrifted" the spraypaint from my parents basement, where I think it was originally purchased to make a costume for a 4-H sheep costume class, and probably hadn't been used since.

Painting:


The finished product:


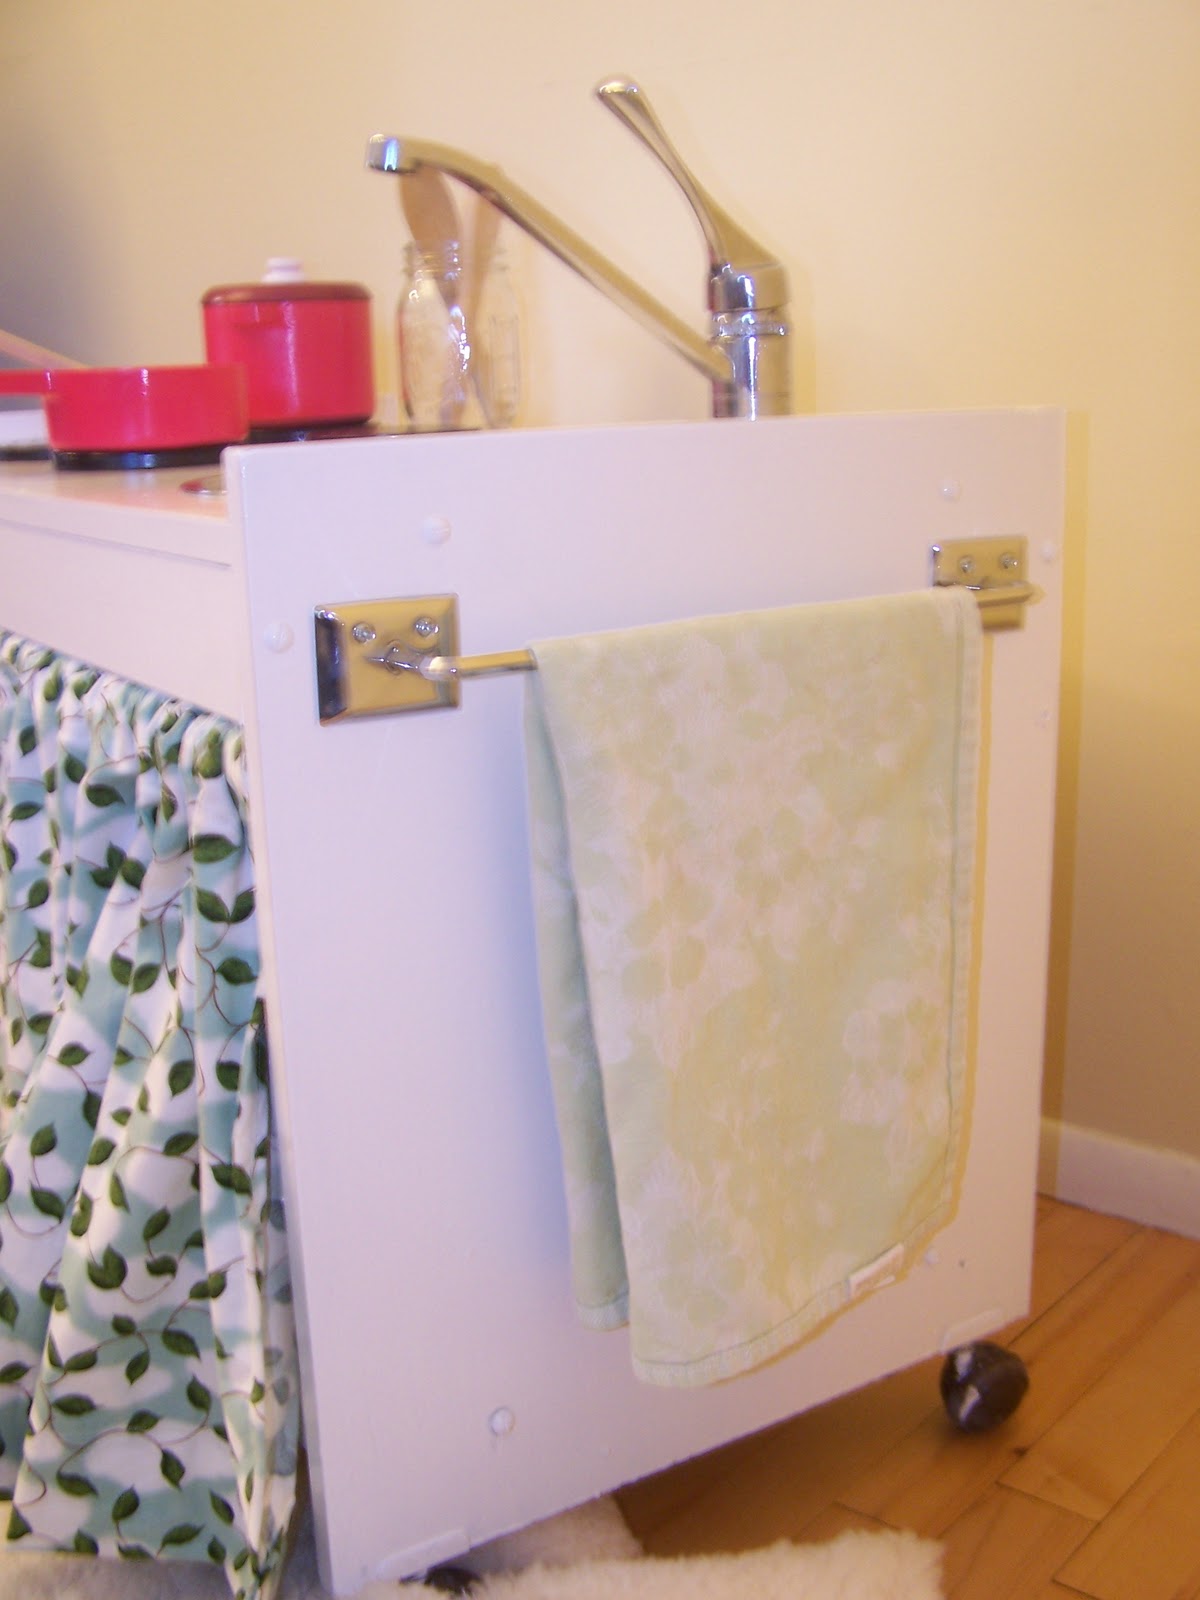
I attached these to the stovetop using wood glue.  I also added a towel bar on one side, and hanging pegs on the other (these, unfortunately, were purchased, not thrifted).

Then, I used this fabric (also purchased) to make cafe curtains to cover the front (hanging on an expandable , adjustable curtain rod):


Voila!  The finished product:


Towel bar:


I also made LW a matching short apron and a coordinating potholder, which conveniently hang on the hanging hooks (I may add one more hook, if I get around to it):


Note, I am very purposefully NOT showing closeups of the potholder.  It would most certainly have earned a white ribbon, had I entered it in the fair growing up.  But I didn't have a pattern, I've never made a potholder or quilted anything before, and I was in a hurry to finish during LW's nap.  It's functional, if a bit stiff, she doesn't care if it's perfect or not.

Also, a not-too-close shot of the apron, for which the former caveat also, somewhat, applies:


It's a little crooked, not really as wide as it should be (sort of a front flap rather than a wrap around), but a good prototype for future attempts.  And, not too shabby given that I wasn't working with a pattern, and just eyeballed the pleats on the bottom. 

The only thing remaining to be done on the stove it to attach stove knobs on the front panel underneath the burners.  These too were repurposed: they were once the knobs on my parents' stove in their trailer, before my dad built our house.  This part can't be done until the next time I visit them, however, since I need my dad's drill press to make the holes.  I'll post a final picture in a couple of weeks.

The final cost tally for the project (which I'm going to call the Grandparents' Toddler Stove)
  • Frame: my parents' old TV stand - a posthumous contribution from my maternal grandmother.  Free.
  • Faucet: my paternal grandparents' old faucet.  Free, but priceless.
  • Stove knobs: my parents' (thus LW's grandparents) old stove.  Free.
  • Paint: 1/2 can @ 12.99 = $6.50
  • Towel bar: $8.00
  • Hooks: $4.00 for two
  • Fabric for curtains: $8 (with 40% off coupon, at Jo-Ann's)
  • Curtain rod: $9
  • Burners: $9
  • Stainless steel bowl: $5
The whole thing came to just under $50, which is less than even a plastic toddler kitchen would cost.  This one should, hopefully, last until we can make one of those lovely wooden heirloom sets.  Of course, now LW needs a refrigerator...

One of the unexpected perks, from my perspective, is a new, out-of-sight storage place for some of LW's toys.  And it looks pretty cute, sitting in the corner of our living room.


But the best part will be watching LW play with it in the months and years to come.  Already she loves moving the faucet, turning the faucet on and off, and taking the bowl in and out.  She also cooked us some of the felt ravioli I made for her.


Now, to find some good patterns for many more kinds of felt food!

Happy crafting, everyone!

Wednesday, March 2, 2011

Yarn Along #1

I figured it was high time I jump on the Yarn Along bandwagon.  I've actually done quite a lot knitting this winter (a lot, at least, given my current responsibilities), but I haven't documented most of it.  I'm hoping doing Yarn Alongs will motivate me to keep knitting into the summertime, when historically I tend to forget about warm, woolly projects.

Anyway, here's my latest project - I just finished it this past weekend.  Technically the second time I'd made it - I knit the whole hat over my Thanksgiving vacation (a couple of days), then tried it on and found it was a little bit too big.  I tried to rip it out from the bottom to take an inch off, but found that it's nearly impossible to rip cables out from the bottom up.  It was such a mess that I had to unravel the entire thing and start over... live and learn, I guess.  I did cast it back on (with smaller needles) and knit a couple of rows immediately, but I just didn't have the heart to go any further for awhile.  So I finished a hat and gloves for my cousin, hat and gloves for my husband, hat for my brother-in-law, and then finally picked this back up three weeks ago.


I used the "Tuppence's Aran Cloche" pattern by Danny Ouellette, found here on Ravelry.   The pattern directions were pretty easy to follow (I loved that there was both a cabling chart, and written instructions).  The yarn is Paton's Classic Merino in (I think - I can't find my yarn wrapper at the moment) Jade Heather.

Here's a closeup of the cabling pattern:


I'm such a sucker for cables.  I love all things Celtic, and Celtic knotwork is no exception.  When I was 16, I made a whole sweater out of these sorts of cables - it took me nearly a year - and like the hat, turned out just a bit too big for me.  I didn't have the heart to unravel that project, so my Mom got a nice new sweater.  You'd think I'd have learned my lesson about needing to do a gauge sample, but no... I still can't be bothered.

A gratuitous pic or two of my little hat model (it's sized for me, so definitely too big for her, but cute nonetheless)


As for what I'm currently reading: I've been switching around a lot, but A Gift From the Sea by Anne Morrow Lindbergh is what I'm primarily reaching for, with Five for Sorrow, Ten for Joy (by Rumer Godden) falling a close second. 


Find more Yarn Alongs over at Small Things.

Have a great day everyone!  May you be blessed with ample time to knit and read!

Tuesday, March 1, 2011

A Random Recipe Post

Since I haven't had time to write about anything interesting lately, I thought I'd at least share a couple of recipes that I'd been meaning to post about.  They are both "my own" although originally adapted or at least inspired by other sources. 

(Completely random aside: I'm writing this while I watch my daughter play contentedly in the bathtub beside me.  We got her one of these for Christmas, and it entertains her so well that now I tend to give her a bath when I just need a couple of minutes to sit and relax.  Of course I have to sit right next to the tub to keep her safe, but it still allows a few minutes respite)

Anyway.  Back to the recipes.

The first is a granola recipe that I've adapted from the King Arthur Flour "Vermont Maple Granola" recipe that I found at The Floured Apron.  The first time I made it basically as she suggested, but I've been gradually making it my own since then; some of the alterations are for flavor, and some for cost.  I usually make a full batch at the beginning of the week, and it lasts my cereal-crazed (seriously - as a bachelor, he used to eat unbelievable amounts of cereal, and he'll still happily eat 2 or more bowls in a day) husband about a week.  Also, don't be put off by the long list of ingredients.  This is SO easy to make, and so worth it, because it lacks all those weird additives, and you can adjust the fat and sugar as need be.

Modified Maple Granola
  • 7 cups old-fashioned rolled oats
  • 1 cup coconut (just the regular sweetened, shredded stuff - no need to toast it first)
  • 1 cup sliced almonds
  • 1 cup other chopped nuts (I use whatever I have on hand - walnuts, pecans, and hazelnuts all work equally well)
  • 1 cup wheat germ (not something I generally had on hand, and pricey, but it does add flavor and more importantly, a lot of nutritional value)
  • a couple good dashes of salt 
  • 1/3 to 1/2 cup coconut oil
  • 1/3 to 1/2 cup brown sugar (adjust to your own sweetness preference)
  • 1/2 cup maple syrup (again, adjust according to your preference.  I made this adjustment primarily for budgetary reasons - I LOVE maple syrup, but until my father gets his sugaring rig up and going again and starts giving it to us for free, the $5/cup sweetener has to be used more sparingly)
  • 1/2 cup or so unsweetened applesauce (this adds flavor, moisture to replace reduced syrup, and all-importantly, makes the granola clump better than in the original recipe)
  • cinnamon to taste (can also add vanilla, if you so desire, but it isn't 100% necessary)
  • a cup or so of dried cranberries
  • a cup or so of raisins
Preheat oven to 250 degrees.  Combine all dry ingredients except for the dried fruit (raisins and cranberries) in a large bowl.  Heat the coconut oil in a small bowl (if necessary to get a liquid consistency - probably not necessary in the summer, but at this time of year mine is solid), and add the maple syrup, stir a bit, then pour over the dry ingredients in the large bowl.  Add the applesauce, and stir until well combined.  Pour the whole mixture onto two lightly greased cookie sheets, and bake (stirring every 15 minutes or so - the parts around the edge and at the bottom cook faster) until crispy and golden brown, around an hour and a half or so.  Mix in the dried fruit, cool completely, and enjoy.

The second recipe is "my own" - I put it together using trial and error, after having a very similar pumpkin soup at a restaurant in Rhode Island a couple of years ago.  We were visiting with friends at the time, and they insisted we try this "out of this world" soup - like pumpkin pie in a bowl, they said.  It was really, really good, and when I came home I tried and tried to find a recipe for it, but couldn't seem to find one anywhere.  Most of the pumpkin soup recipes on the Internet are for savory soups rather than sweet, and the one sweet one I tried (and posted about, previously) really fell short of what I was looking for.

So, here it is: it's sweet, creamy, and yes, like pumpkin pie in a bowl, but it also packs a nutritional punch with all of that yummy pumpkin.  Thus it is currently a great way to sneak veggies into my toddler, who will pack it away quite happily.  For little ones like her, I suggest adding a couple of tablespoons of oat or rice cereal, to thicken it up for better "spoonableness" (and doing so also adds iron).

Abby's Pumpkin Pie Soup
  • 1 can pumpkin puree (15-16 oz)
  • 1 cup milk
  • 1/2 cup heavy cream, + 2 tbsp for thickening
  • 2 tbsp (or a bit more) flour (for thickening)
  • +/- 2 tbsp brown sugar (adjust to your sweetness preference)
  • 1/8 tsp ground ginger
  • 1/4 tsp ground cinnamon
  • 1/4 tsp ground nutmeg
  • 1/4 tsp vanilla extract
  • dash of salt
Combine pumpkin, milk, sugar, vanilla, and spices in saucepan, stirring until well mixed.  Cook until almost simmering, then turn heat to low.  Stir in cream.  In a small bowl (a jelly jar or glass works great), combine about 2 tbsp of cream and 2 tbsp of flour.  Whisk this mixture into the soup, and heat gently until thickened (can repeat this step with more cream and flour for a thicker soup).  Serve and enjoy.

I hope you all try and enjoy these recipes.  In other news, stay tuned for an upcoming post on the re-purposed play stove top I've been making for my toddler!