Showing posts with label Crafts. Show all posts

Thursday, March 3, 2011

A Toddler Kitchen from (Mostly) Repurposed Items

Finally!  It's done.  Or at least, done enough to blog about.  There's one final detail that can't be done for a couple of weeks, but I've basically finished LW's stove!

I got the idea for this back around Christmas.  LW was just starting to get the idea of "cooking," and it seemed like something she'd really enjoy.  Our Christmas visit to my mother-in-law's house confirmed it: she'd found a toddler kitchen somewhere, and my daughter really went crazy playing with it for the two days we were there.  One of my mom and dad's presents to her was some toddler cookware, so when we got home, I started looking around for something that could function as a stove.

Now, truth be told, I really have my heart set on either buying or building something like this one by Camden Rose.  But we didn't, don't, and won't have that kind of cash kicking around anytime soon, and until my father gets his real woodshop up and running (he has the tools, but needs to build the shop to house them and move it all out of their basement), building won't be happening, so I needed a good interim solution.

While looking around our own basement for inspiration, I uncovered and remembered this:

(I know the picture is dark.  I took this photo right before we started working on it, we were at my parents' and I didn't have my good camera, so had to settle for my husband's phone)

This ugly, beat-up TV stand has been in my family for nearly my whole life.  My grandmother picked it up at a yard sale when I was maybe 7 or 8, I think she used it briefly (or maybe not?), and then it was my parents' TV stand for years.  Around the time I was 18, my brother and I got them an entertainment center as an anniversary gift, and the TV stand was retired, only to then go off to college with me.  It followed me to my first apartment, back home again, then to our apartment when we got married.  Shortly after LW was born, our landlords gave us their old stand, which was much nicer, so this one again was retired.  Really, I was planning on junking it, but fortunately hadn't gotten around to it yet.


Pictures don't really do adequate justice to how junky this thing was.  Made of that wood veneer particle board, which had gotten water damaged and was all bubbly across the top, it probably wasn't worth much when brand new, and I think my grandmother got it for for around $5, over twenty years ago; suffice it to say, it had seen better days.  This picture was actually taken after the first modification: whoever put it together in the beginning, put the bottom shelf at a weird sloping angle (perhaps it was supposed to be that way, to hold VHS tapes?), so I removed two of the screws and put it back on flat.

We (my journeyman carpenter earlier in life, father and I) removed the top piece, and I sanded it down.  Then we cut a circular hole on the right hand side, cut a new backpiece as the existing one was broken, and put everything back together.  I painted, painted, and painted some more - four coats in all - and here it is.  As my husband said, "Wow, who knew it could look that good.  We should have painted it a long time ago!"


Despite sanding it flat, the bubbles reappeared once I put the paint on - probably because those areas swelled more with the moisture.  But after the fourth coat of paint, they weren't really that noticeable.

Also providentially (for me, anyway), my aunt's faucet had broken recently, and my dad went over to fix it while I was visiting.  I quickly pleaded with him to save the faucet for this project.  This was fortunate, as these faucets are quite pricey new, and I hadn't been able to find a used one.  This also added to the multi-generational and sentimental value of the piece, because my aunt lives in what was once my grandparents' house.  They both passed away years ago, but this is the faucet that they used for years and years, and which I remember using at their house whenever I visited while growing up.

Of course, it was pretty obvious that it'd been in use for years when I first got my hands on it:


That's about 30+ years of mineral accumulation.  It polished up nicely, though, as you can see in the next photo, where I've polished just one side for comparison:


My dad used a hacksaw to cut the copper wires off from the bottom; here it is all polished and ready to go.


We drilled two holes in the top of "stove" to screw it down, and after the paint finally dried, I attached it.  We also purchased a stainless steel bowl for the "sink", which I left unattached so that LW can take it in and out (I think this is her favorite part), and also so that I could fill it with water or bubbles and be able to dump it easily.  Here it is, attached:


For the "burners," I found these wide, grooved coasters on Amazon.  They are just the right width for her pots, and the grooves made them the closest thing to real that I could find. 


I spray-painted them with a glossy, "metallic black" spraypaint; it has little gold flecks in it that worked perfectly to make the finished product look real.  The bonus was that I "thrifted" the spraypaint from my parents basement, where I think it was originally purchased to make a costume for a 4-H sheep costume class, and probably hadn't been used since.

Painting:


The finished product:


I attached these to the stovetop using wood glue.  I also added a towel bar on one side, and hanging pegs on the other (these, unfortunately, were purchased, not thrifted).

Then, I used this fabric (also purchased) to make cafe curtains to cover the front (hanging on an expandable , adjustable curtain rod):


Voila!  The finished product:


Towel bar:
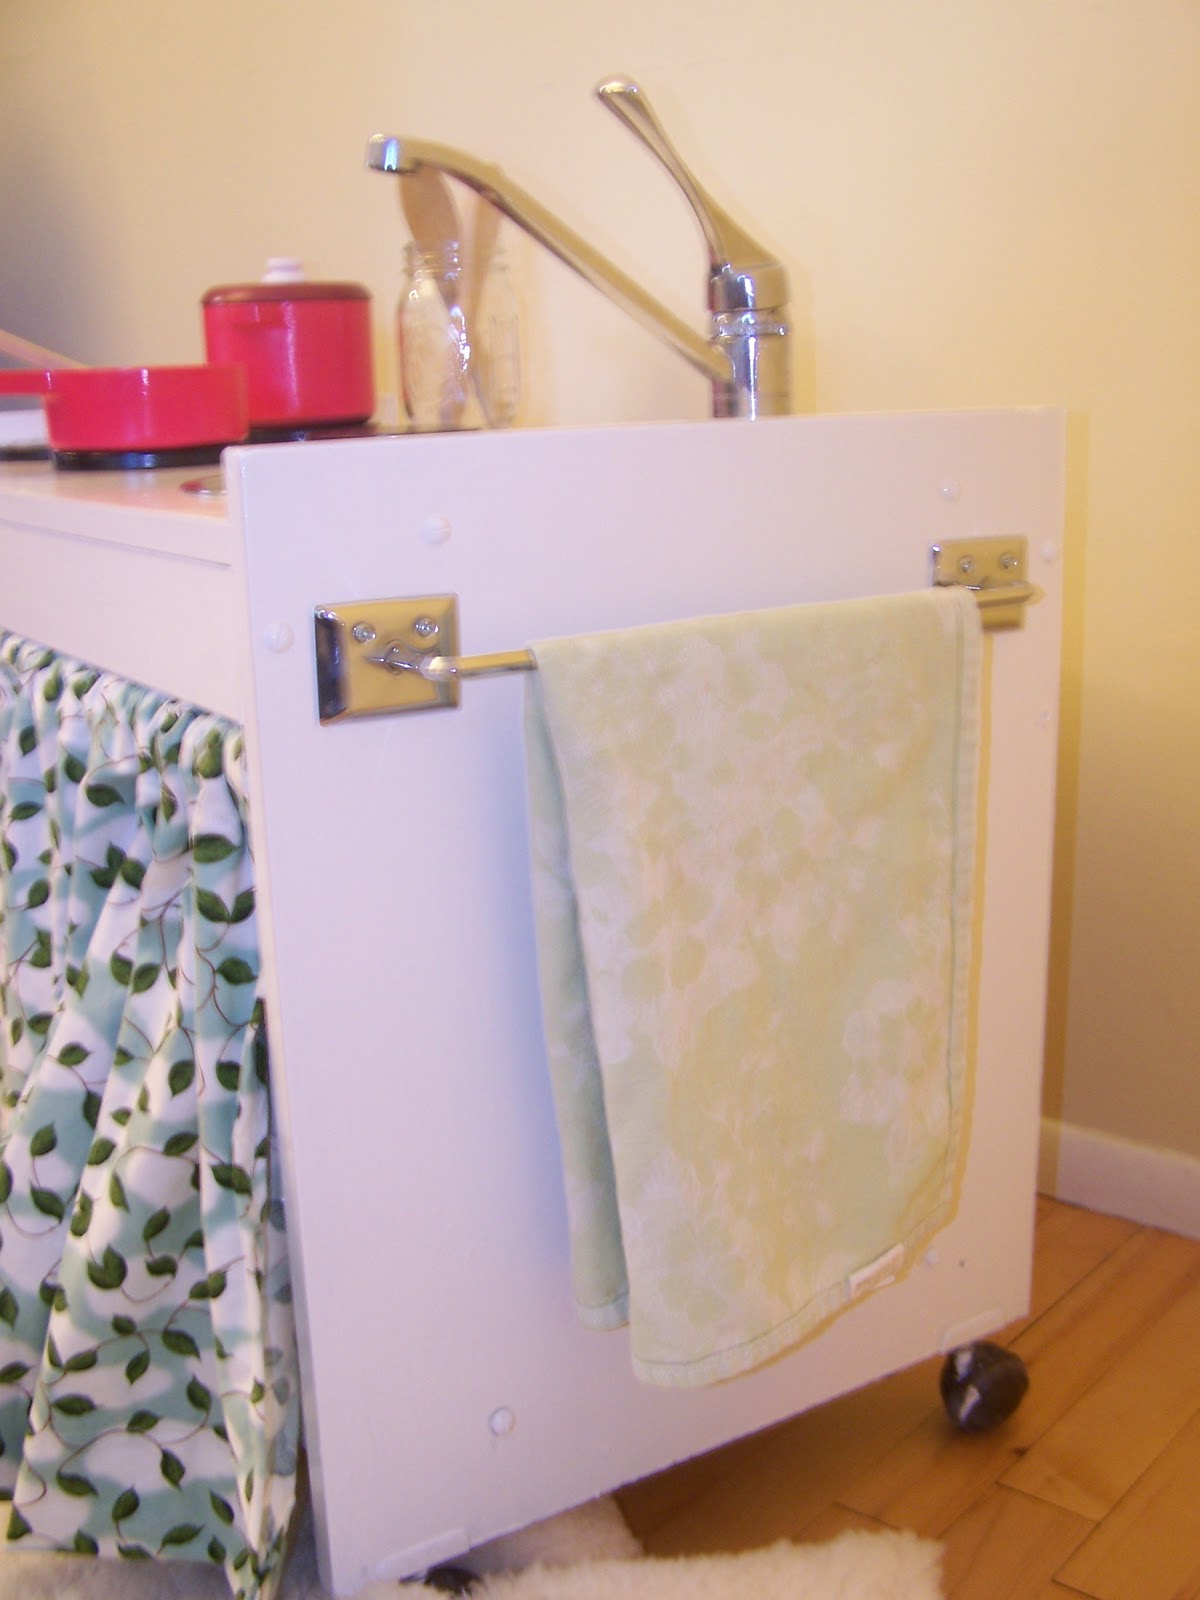

I also made LW a matching short apron and a coordinating potholder, which conveniently hang on the hanging hooks (I may add one more hook, if I get around to it):


Note, I am very purposefully NOT showing closeups of the potholder.  It would most certainly have earned a white ribbon, had I entered it in the fair growing up.  But I didn't have a pattern, I've never made a potholder or quilted anything before, and I was in a hurry to finish during LW's nap.  It's functional, if a bit stiff, she doesn't care if it's perfect or not.

Also, a not-too-close shot of the apron, for which the former caveat also, somewhat, applies:


It's a little crooked, not really as wide as it should be (sort of a front flap rather than a wrap around), but a good prototype for future attempts.  And, not too shabby given that I wasn't working with a pattern, and just eyeballed the pleats on the bottom. 

The only thing remaining to be done on the stove it to attach stove knobs on the front panel underneath the burners.  These too were repurposed: they were once the knobs on my parents' stove in their trailer, before my dad built our house.  This part can't be done until the next time I visit them, however, since I need my dad's drill press to make the holes.  I'll post a final picture in a couple of weeks.

The final cost tally for the project (which I'm going to call the Grandparents' Toddler Stove)
  • Frame: my parents' old TV stand - a posthumous contribution from my maternal grandmother.  Free.
  • Faucet: my paternal grandparents' old faucet.  Free, but priceless.
  • Stove knobs: my parents' (thus LW's grandparents) old stove.  Free.
  • Paint: 1/2 can @ 12.99 = $6.50
  • Towel bar: $8.00
  • Hooks: $4.00 for two
  • Fabric for curtains: $8 (with 40% off coupon, at Jo-Ann's)
  • Curtain rod: $9
  • Burners: $9
  • Stainless steel bowl: $5
The whole thing came to just under $50, which is less than even a plastic toddler kitchen would cost.  This one should, hopefully, last until we can make one of those lovely wooden heirloom sets.  Of course, now LW needs a refrigerator...

One of the unexpected perks, from my perspective, is a new, out-of-sight storage place for some of LW's toys.  And it looks pretty cute, sitting in the corner of our living room.


But the best part will be watching LW play with it in the months and years to come.  Already she loves moving the faucet, turning the faucet on and off, and taking the bowl in and out.  She also cooked us some of the felt ravioli I made for her.


Now, to find some good patterns for many more kinds of felt food!

Happy crafting, everyone!

Monday, December 6, 2010

Hat and Gloves for faraway cousin

One other project that I can share about pre-Christmas, since a) she already knows about it, and b) being in China, she can't read my blog anyway (that whole non-freedom of the press thing, not a lack of Internet access).  The other day I had an email from my cousin, who is spending a year in China.  She's in a pretty remote village, in a house without indoor heat (although they do have a space heater, unlike many others in the village), so when I somewhat jokingly offered to mail her some coffee for Christmas, she quite seriously replied back that what she could use most would be a wool hat and some fingerless gloves.  She's doing music therapy there, so she needs her fingers free for flute/guitar/etc, but these would keep her hands warm at the same time.

Since I just so happened to have some extra yarn on hand, I did a quick Ravelry search (if you're a knitter or crocheter and aren't familiar with Ravelry, you must look into it, and sign up!  It is the best for finding great patterns for free or low cost), and found the perfect pattern for what I was looking for.  It's called "Treads" and can be found at the blog RainDrops.

On size five needles, and with worsted weight (Bartlett's Classic Merino, I believe, in a heathery cream/taupe) yarn, this was a really quick and surprisingly easy knit.  I've done toed socks before, so I was familiar with how to make fingers, but I did get to learn how to do a horizontal braid (easy and very cool).

Here's the project on needles (you could do it on a small circular needle, but I hate circulars.  Give me DPs any day):


Completed fingerless glove:


I like that there is an extra layer of warmth at the wrist and across the knuckles (and it doesn't look as bulky in person); it's nice for those of us with joints that don't like the cold.  I also like the ample wrist length, making it easy to leave it up for extra warmth, or roll it instead.

Here's my helper testing the fit (a bit big on her, but should be perfect for my cousin, I hope):


I also had a hat that I'd made and intended for my brother-in-law, but that I was concerned might be a bit too small.  Since I'd made it in the matching yarn to the gloves, I decided to throw that in as well.  I used The Boyfriend Hat pattern from the blog Stephanie Likes to Knit.  Again, this was a quick and easy knit - a simple knit three, purl two rib, with some neat decreases that maintain the ribs all the way to the top of the hat.  The sizing problem was my own fault; I misread the needle size and knit in a size 5 instead of the suggested 8.  It's very stretchy, so the width would be no problem on most people's heads even with the size 5 but it was just the right length for me, so maybe not quite right on an adult male head.

Having some soft, plush polar fleece in the back of my closet that I'd intended to make pocket diapers with (remember the cloth diaper making fiasco from earlier this year?), I decided to take a stab at making a headband liner inside the hat for a little extra warmth and the extra snugness that it would provide (this is my insurance against the hat being a little too short).  It actually came out pretty well, for my first try at such a thing: I don't usually sew with stretchy fabrics, so I was pleased to find that the zigzag stitch allowed ample stretch, and it all went in just fine:

(The inside of the hat)


(And the outside)

You can see the stitching a little bit, which I guess is unavoidable since it doesn't have a rolled brim.  But I don't think it detracts, overall.  Plus, fleece lined wool: what's going to keep her warmer than that?

The finished gift, ready to be shipped to the other side of the world:


And me enjoying the warmth... I mean, wearing just for photographic documentation purposes:


More project stories to come in a few weeks, along with hopefully other sorts of posts!

Sunday, December 5, 2010

Jesse Tree Project

Of the several crafty projects I've been working on or have completed lately, here is one that I can actually share (don't worry, I'm taking pictures of the rest for post-Christmas blogging).  Thus, if anyone ever wonders why I never seem to post anymore, here's a snippet of what I've been busy with (I'll also share one other slightly less involved project tomorrow.)

Making a Jesse Tree:

Several blogs I visit regularly, along with Faith and Family, posted articles about Jesse trees at the beginning of Advent, and this year I finally resolved to incorporate the practice into our budding family traditions.  LW isn't old enough to appreciate or understand yet, but I thought the scriptural aspect (tracing the genealogy and prophecies leading to Jesus) would be fun and spiritually good for Jim and I, and that it would be good to establish the tradition now when I'm not too busy, so that it's in place when LW does begin to understand. Plus, I'm convinced she knows a lot more than we think she does!

However, I wasn't sure exactly how to make this happen, with time and financial resources currently very limited.  I didn't want to spend the money on a Jesse tree kit, and I wanted something substantial enough to last for at least a few years.  Fortunately, over the Thanksgiving holiday I stumbled on a copy of The Catholic Home: Celebrations and Traditions for Holidays, Feast Days, and Every Day at my parents' house.  Along with a ton of other great info for the rest of the year, it had just what I needed for this project: a list of the symbols, along with accompanying Scripture verses to read each day.

I toyed with the idea of decoupaging pictures onto wooden disks, but then remembered that the decoupage glue makes ink jet printed images run, and I knew it would be way too much work to track down all the symbols I needed in magazines (not that we have magazines kicking around the house anyway).  Fimo or Sculpey would work, but I wanted something I didn't have to go to the store for, as I've pretty well exhausted LW's limited patience with the craft store already this holiday season.  Then I remembered the salt dough ornaments my mom helped us make as kids.  A quick Google search located one of the thousands of essentially identical salt dough recipes on the Internet (two parts flour to one part each of salt and water), and pretty soon I was kneading and shaping the little symbols from the book.

Aside from a few interpretation questions ("how the heck do I make a camel/burning bush/river?"), all went smoothly, and I had enough dough leftover to make a few ornaments for LW to decorate for gifts, along with one nice big hand print for her to have as her own ornament.  Here everything is baking in the oven:


Impatient helper peaking at the ornaments (yes, she is pajamas; yes, it is the middle of the day.  Please don't judge me):


Here are some of the baked items, awaiting painting:

 
Snake/apple (Adam and Eve) and oil lamp (Samuel):


Other items painted and hanging to dry (herein are my interpretations of "river" and "burning bush": 


Once I completed all the ornaments, I used clear spray paint to "seal" them (hopefully this will work.  I sort of grabbed the wrong stuff at the store.  Husband said, upon seeing it, "what are you going to use the Rustoleum for?")  Regardless, they are shiny and relatively "sealed", and if I have to make more ornaments next year, no big deal, since this was a lot of fun!
 
The last dilemma to solve was what to hang them on.  The craft stores didn't seem to have anything that would really work, but on a last minute inspiration, I tried the dollar store.  Voila!  A little mini tree, covered in glued on "presents and bows", for the perfect price of $1.  The tacky decorations ripped off easily (I left the top one because it was actually kind of pretty), leaving a tree of the perfect size and shape, and with the perfect amount of good strong branches to hang the ornaments on.
 
The end result: the first few days of sealed, finished ornaments, hanging on the tree on our bookshelf (by the shepherd and animals from our newly purchased nativity set, who are waiting for the rest of the company to join them later in the month):


A couple of closeups of ornaments (yes, that is a camel in the second photo):


 Finally, the rest of the ornaments, layered for easy access in the following days and weeks:


The whole project cost less than $10, and took a sum total of a couple of hours (over a couple of days, due to the drying time for paint and Rustoleum) to complete.  We've been doing Jesse tree readings every night (gratuitous shot of husband and baby, who again, is in her PJ's, but this time it is bedtime so I don't feel as guilty):
 

The whole process, especially the symbology tied to each person in the genealogy and the accompanying Scripture, is definitely a nice addition to our Advent.  Definitely a worthwhile tradition to consider for your own family!

Tuesday, August 17, 2010

Slowing down..

It's been a very busy couple of weeks: dress making, cake making, wedding festivities, and then a full week off for both my husband and I, which meant coming up with some fun things to do to make our vacation "count".  Towards the end of the week, my daughter came down with Coxsackie virus (if you've never heard of it, don't worry - I hadn't, either), so she was a miserable camper for a few days, and we ended up having to postpone our planned trip to the ocean.  Now I've got the same miserable sore throat that she had, and am finally listening to my body's cues to just slow down a little.  Hence the renewed quiet on the blogging front (I know, I've spent most of the summer apologizing for being quiet!)

The end of the summer always brings a particular frenzy of activity: that first burst of fall color in the trees sparks a sense of urgency, as I try to squeeze in every last one those activities planned back when summer was just an oasis glimpsed distantly through winter-sick eyes.  Complicating and adding to that last burst of planned fun, I always seem to experience a huge creativity surge as the weather gets cooler.  If you've ever played Sims2, they hit the nail on the head - the characters are more motivated to learn and do crafty things in the fall.  Not that I've had any time for such games since the stork dropped off LW, but the analogy comes back to me at times like these, just the same.

Anyway, I've got skirt patterns, patterns for LW, plans to make more throw pillows, and stacks of books that I'm gathering to read; plans to pick apples and put away crisps and butter like last year; harvesting, preserving, and also have some other ideas and projects that have been waiting for cooler weather and more indoor time.  I'm reflecting more on faith, on vocation, on who I am and who God is calling me to be.  I suppose it's always this way at the change of a season (which makes me wonder, what is it like in those parts of the world with no, or different, seasons?) - the space between seasons is a transition time, a "time-between-times" as in Celtic mythology, and as such, is a perfect time for reflecting, taking stock, and also for making plans for the future.  However, this end-of-summer cold is reminding me not to burn myself out in a frenzy of "enjoyment," but rather, to take some time just to be; to go on walks, or maybe just lay in bed and listen to the breeze (if I can get LW to occupy herself, somehow!)  In short, to enjoy the "now" of the end of summer.

So, what about all of you?  Do you experience an end-of-summer frenzy, or a burst of creative energy at the beginning of Fall?  Or how do you stay in the moment, in the midst of the always-moving busyness of life?

Saturday, May 22, 2010

A homesteading Saturday

What a beautiful day in our neighborhood!  Warm, sunny, and best of all, my husband let me sleep in this morning and promptly removed the early bird LW from the bed, and hence my productivity when I did get up was quite high :)  Jim had to work (he's a cemetery superintendent, which unfortunately equals some Saturday work, especially in the summer) for awhile, so it was a great time to busy myself with the Rhubarb Marmalade that a friend sent me the recipe link for:


I should note that I'm ridiculously thankful to my parents for both instilling canning skills in me (yay 4-H!) and also for setting me up with some of the tools of the trade.


The finished product; 8.5 beautiful jars, and the fruit didn't even rise to the top.  I gave one to our landlords as a thank you for letting us harvest from their rhubarb patch, and the rest have been stocked away for yummy eating.  Unfortunately, the husband doesn't like rhubarb.. so I guess more for me :)


I also put in our tomato seedlings while LW looked on from the safety of her blanket, and then made some fantastic french toast with cinnamon swirl bread from Great Harvest for dinner.  LW had her first french toast (regular, not cinnamon bread), and dove in with great enthusiasm.

I have to say, I get so much enjoyment out of gardening and canning.  It feels good to work with my hands, and also to use the knowledge and wisdom passed down from generation by generation.  I always think of those who taught me the skills - my grandfather, my dad, my mom, 4-H leaders, etc.  For instance, Grammy Fenton (a woman who ran the canning dept. at our local fair for decades) would be proud :)

It is also fun to have mastered skills taught to you as a child to the point where you can confidently do them independently.  So many of the things that I learned growing up, I absorbed because "that was the way we did things."  Weekly church attendance, gardening, spinning, sewing, knitting, canning, baking, horses, sheep - I took for granted that this was the way most families were, but as I have grown I have found just how unique my upbringing was.  Not every ten year old is allowed to have their own fire, nor helped to start one in the winter (via a fatherly intervention with a blow torch); not every thirteen year old is given her own horse to raise and train.  I now know that my parents were sort of "Montessori" in their approach, though not strictly or even all that intentionally - but whatever you want to call it, it was a great way to grow up, and I hope LW can enjoy many of the same things.

Now, speaking of whom... time to get the baby ready for bed :)